Monday, August 30, 2010

We're still here!

Just a quick note to say hi - and we are still here - and crafting in some way or another! Life has been busy for all of us the last few weeks - winter ills, moving house, birthdays and weekends away among other things :) And some projects just take a little while before we can share!


In the meantime I have finished my I Spy quilt - quilted myself and all. For a few more photos see my blog :)

Bec

Thursday, August 12, 2010

I Spy Quilt with a border!


I thought I would quickly add a photo of my I Spy Quilt top now that it has a border - it's amazing how it 'finishes' the quilt off. I used navy for a thin border around the squares and then a blue star print for a thicker second border. Once it is quilted I will use the same navy for the binding.


Why blue? To come to that decision I actually used Microsoft Paint - I imported the photo of the finished sqaures, deleted the background so it was surrounded by white space and then used the thick line tool to draw around the squares (to represent the first border). Then I drew around it again with a thinner line to represent the thicker border and used the bucket (not sure what that one is called) to fill the second border with colour. That way I could try all different colours with a click of a button to see what worked best!

I thought I saved the paint picture so I could share it but I can't find it!

Bec

Tuesday, August 10, 2010

Pattern for Newsboy Cap

Hello again, I just had a phonecall this morning from someone who was hoping to try out my own pattern for the Newsboy Cap. So here it is! My first attempt at writing a pattern! If there are any queries or obvious discrepencies please let me know! :) 
Please also let me know if you've used the pattern and how it turned out!


Notes:
This pattern is written in UK/AUS terms

Stitches used are ch- chain, dc- double crochet, tr- treble, dec tr- decrease treble, sl st- slip stitch
Ive used 8ply wool/cotton with a 5.00mm hook.
Tutorial for dec tr (decrease treble) stitch added at the end of this post.
This hat should fit approx 1-3years old.
To make larger, add a couple more increase rows, after row 11.
Instructions between * * need to be repeated as many times as indicated.
The 3ch at the beginning of each row is counted as 1 tr.


Start: ch 3, sl st in 1st ch to make loop

Row 1: ch 3, 15 tr in loop, sl st into the 3rd ch from beginning (16st)

Row 2: ch 3, 1 tr in same st, *1 tr in next st, 2tr in same st* x 7, 1 tr in next st, sl st into 3rd ch from beginning. (24st)

Row 3: ch 3, 1 tr in same st, *1 tr in each next 2 st, 2tr in same st*x 7, 1tr in each st to end and then sl st into 3rd ch from beginning. (32st)

Row 4: ch 3, 1tr in same st, *1 tr each in next 3 st, 2 tr in next st* x7, 1tr in each st to end and then sl st into 3rd ch from the beginning. (40st)

Row 5: ch 3, 1tr in same st, *1 tr each in next 4 st, 2 tr in next st* x7, 1tr in each st to end and then sl st into 3rd ch from the beginning. (48st)

Row 6: ch 3, 1tr in same st, *1 tr each in next 5 st, 2 tr in next st* x7, 1tr in each st to end and then sl st into 3rd ch from the beginning. (56st)

Row 7: ch 3, 1tr in same st, *1 tr each in next 6 st, 2 tr in next st* x7, 1tr in each st to end and then sl st into 3rd ch from the beginning. (64st)

Row 8: ch 3, 1tr in same st, *1 tr each in next 7 st, 2 tr in next st* x8, 1tr in each st to end and then sl st into 3rd ch from the beginning. (72st)

Row 9: ch 3, 1tr in same st, *1 tr each in next 8 st, 2 tr in next st* x7, 1tr in each st to end and then sl st into 3rd ch from the beginning. (80st)

Row 10: ch 3, 1tr in same st, *1 tr each in next 9 st, 2 tr in next st* x7, 1tr in each st to end and then sl st into 3rd ch from the beginning. (88st)

Row 11: ch 3, 1tr in same st, *1 tr each in next 10 st, 2 tr in next st* x7, 1tr in each st to end and then sl st into 3rd ch from the beginning.(96st)

Row 12, 13, 14, 15 : ch 3, 1 tr in each st all the way round, sl st into 3rd ch from beginning. (96st)

Row 16: ch 3, *dec tr (2 st together), 1tr in next st* all the way round, may require 1 tr in last stitch, sl st into 3rd ch from beginning.

Row 17, 18, 19: ch 1, dc in each st all the way around (remembering on row 16, to keep the dec st from last row together, and not to put a stitch between them.) sl st into 3rd ch from beginning. Do not fasten off.

*************************************************

Brim:
Row 1: turn, dc, dc, *2tr in same st, tr* x8, 2tr in same st, dc, dc, dc

Row 2: turn, dc in 2nd dc from last row, dc, 2 tr in same stitch (should be above the 2tr from last row) then tr, tr, 2tr in same stitch (should be above the 2tr from last row again) and then tr in each stitch till you get to the point of repeating that sequence (in reverse) to match the other side. Finish with and extra dc into the base of the hat again..

Row 3:  turn, dc, dc, tr, tr, 2tr in next st, then tr to the point where you repeat the stitches in reverse to match other side. Fasten off and sew in ends.

***************************************
Here is a picture of the top view of  the cap Im currently working on. Gives you an idea on how the increase rows look:


Tutorial for dec tr stitch (decrease treble)
Work a tr in the next stitch without completing the very last step (leave the last two loops on the hook), then tr in the next stitch without completing the last step. You should have three loops on the hook then yarn over and draw through all the loops. Decrease made.

Have fun!
xx Emma

17/3/11 edited to add.
If you have queries about the pattern, and you found it via Ravelry, feel free to PM me, my username being Leftlady, and I will be happy to help!

Monday, August 9, 2010

Tag Blocks


Hello again, today I had some free time while my 8 month old had a sleep and so I thought I would try one of the new patterns that I just bought. Of course my 2 1/2 year old was more then eager to help me:) This is a test one to see how it works, and it turned out quite cute I thought. I just have to buy some ribbon to put along the outside edges. Can't wait to go out shopping for some supplies..  I bought the pattern from http://bubbamiafabrics.com.au/. They have many wonderful patterns and have already bought a few. Can't wait to try out the others as well. Going out shopping thursday nite to get some material to try out a new bag patterns, and so get some more for my tag blocks.

Bag


Here is a pic of some of the beading, a bit hard to get them on camera, or I should say my camera.
Here is another bag that I finished this weekend. I bought a skirt at an op shop and thought I would make something with this, and so I made it into a bag. It turned out quite nicely, and I sewed some beading just for a little extra something, So you can see you can make a bag out of anything. It turns out just as nice. Henrietta
Posted by Picasa

Crochet Hook Roll

This morning (after a spot of housework dont worry!) i made this Crochet Hook Roll for the Crazy Crocheter (aka Emma!) among us. After seeing my pencil roll in the previous post Emma mentioned that a similar roll to put crochet hooks in would be very handy so instead of upsizing the pencil roll i googled crochet hook roll tutorial and came up with this one. Below is a photo of the finshed product which i think the new owner is pretty happy with, unfortunatly i cant show you a pic of it filled or rolled up because i dont own any crochet hooks!! 

♥ Sharelle

So its Emma here now, just hijacking Sharelle's post to add a couple of pics of it being used! :)

Its so pretty, thanks heaps Sharelle!!

Saturday, August 7, 2010

Pencil/Crayon Roll

Yesterday i managed to have both kids down for a nap at the same time (a rare occasion in this household!) so i thought what better excuse than to do a bit of sewing! Iv been wanting to tackle making one of these Pencil/Crayon Rolls for some time and thought it would be a nice, quick and easy project for the afternoon! I followed the tutorial found here, although iv found if you google Crayon Roll Tutorials it comes up with pages and pages of them! The only problem i did encounter with making this is that my printer was out of ink, my computor is located in the study and my sewing machine is in the games room, needless to say i found my 30mins of daily excerise running back and forth to follow the instructions ;-)
I did intend for this roll to have crayons inside but my quick shopping trip was only able to produce a packet of small pencils! If anyone knows where you can buy boxes of the small crayons i would love to know!
Rolled Up
Open
♥ Sharelle

Thursday, August 5, 2010

I Spy Quilt


My first contribution :-)

Today I finished sewing together the top of my I Spy quilt for the kids, head over to Sewing Belle for more info!

Bec

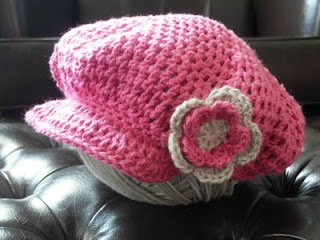
Newsboy Cap for a Girl.

Another project done!
Yes I know, very quick. What about the housework, you say?
But I do have some good excuses!

Firstly, I had these 3 beautiful balls cotton turn up on my doorstep yesterday, so I was itching to use them. I ordered them a good week ago from Bendigo Woollen Mills to make some hats that I'd promised for a few people. Since then Ive put another 3 colours on order, they should be here any day now, cant wait!!

Secondly, my dear husband was away on a business trip and was gone for the night so I had to do something to keep myself busy once the girlies were in bed. Crocheting infront of the TV passes the time well.

And Thirdly, well, this blog is doing its job again. :)

Once again I cannot take credit for the hat idea or pattern. As I found it all online. The inspiration for the style comes from a page that Im a fan of on Facebook. NuxieMade has some gorgeous pieces, and if I can ever become as skilled as this lady with a crochet hook I would be happy!! My newsboy cap attempt is not half as fancy either. My crocheting vocab does not exceed the terms ch, sc, dc, tr and sl st.
This free pattern is where I started, but since then Ive altered it considerably to suit myself, but I would still like to give credit where credit is due! The flower pattern is found here
This cap would fit the head of a 1-3year old. My little 2 year old is asleep right now, so I couldn't use her as my model. So instead Im using one of the balls of cotton... yes they're huge, 480 odd meters on it!!
This cap will most probably be going to a little girl who will be turning 2 next month.. hopefully she (and her Mum) will like it!
OK, now I must go and do some housework!

Emma

eta- Here's Matilda modeling it for me. This is her "Im trying to watch Playschool here" pose!

Wednesday, August 4, 2010

A Bag

Here is my first post, a bag for my niece Morgan. I got the pattern from my friend Sharelle and I used the medium sized one. I also used the metal clasp to close it and I also sewed a pocket inside. I purchased the fabric from spotlight and am quite happy with the way it turned out. I will be making more bags small, med and large for my family members. A friend suggested I add a tie on the side and I think it just adds a little something to the bag. well here is my first of many posts and I am off to make dinner now. Tomorrow is another sewing day for me and so will see what I get done tomorrow:)
Henrietta
Posted by Picasa

A Nappy Bag

Well here is my first craft related post! This is a Nappy Bag & matching Nappy Wallet i made for myself last week! Finally something i actually sewed for myself :) I am not sure where the pattern for this bag originates but it was passed onto me from my Mum,.There are 4 different sizes of bags you can make, Extra Large (being the one i used) Large, Medium & also Small. The small version is suitable for a little girl and they are adorable!


Anyway back to the bag i made, i found the fabrics at a local patchwork shop in town and fell in love with them! To customize the bag to suit me i added two pocket's to the inside lining of the bag, one to fit my mobile phone in (so much easier than trying to find it in the bottom of my bag!) and also one to hold a baby bottle. I lined the pockets with Iron-on-Interfacing to give them added support as well, lastly i also added a magnetic clasp so that it holds together nicely!
Front of Bag


Next i made a matching Nappy Wallet, this is actually a pattern i designed myself, i have sold a few of these in the past. To this particular one though i added a pocket to the inside which nicely holds some nappy rash cream or in my case a spare pair of jocks for my 2.5yr old!

Closed Nappy Wallet
Open Nappy Wallet


So there you have it, my first craft related post! Hope you like it :) now i cant wait to see what the other girls have been upto!
 
♥ Sharelle

Crocheted Baby Sandals


Well this blog is doing the trick already. I was so excited to be able to put up my first post that it encouraged me to finish off this job this afternoon. I discovered the pattern for these sweet baby sandals on Ravelry a few weeks back and this is the first pattern Ive ever bought. This little pink, cream and grey pair is my second attempt at the pattern and they will be heading over to Canada to my new little niece. Hopefully they will get a bit of wear before their summer is over!
The designer of these cute little sandals is Lisa van Klaveren of Holland Designs and you'll find so many gorgeous patterns of hers here. Im definitely trying out more of them in the future.

Emma

Introducing Henrietta....

Hello, my name is Henrietta Ten Haaf. I am a Christian, mother to 2 beautiful girls, Angelina 2 1/2 and Tess 8 months, and have a wonderful husband.  I moved here from canada just over 3 years ago, found some wonderful friends, and have found a love for sewing. I enjoy getting together once and awhile to catch up and of course to do whatever craft we are busy with.  I never thought I had a real crafty side to me, but since being married and a stay at home mom, that side seems to be coming through. I am not one to be bored, which you almost never are with 2 kiddies to look after, and always looking for something new to try.

I have cross stitched for most of my life already so sewing it still new to me but loving it and can't wait to learn more. I also learned to knit, just the basics, and since sewing has come on the scene that has been put on the back burner. There are so many things I would love to do and its amazing when you think to yourself where do I find the time.  First on my list is to learn how to crochet, and then we will see where that takes me to.

With my cross stitching I am into old patterns and making keepsakes for the family. With sewing I am into making nappy bags and have a few new patterns that I am really looking forward to trying out. With crocheting I can't wait to learn and sew some blankets for the girls rooms. Looking forward to starting the blog and showing our projects to you all!!!

Tuesday, August 3, 2010

Introducing Bec.....

Hi, my name is Bec! I am a Mum to a 4 year old and a 2 year old with another on the way around the New Year. Life is busy at home but I love to take time out to spend on my crafts – every day if I can even if only for 5 minutes.

I am a self-confessed craftaholic and I think I have tried almost every craft known to man – which isn’t always a good thing because it means I have a mountain of un-finished projects. As a child my Oma (Grandma) taught me to knit and crochet and she definitely instilled in me a love of craft along with my Mum who was always sewing clothes, knitting or cross-stitching at home - she was always there to fix my mistakes!

I didn’t particularly enjoy sewing in high school but now when I look back it was mainly the projects we had to make – not the sewing itself! Since having kids I have a new found passion for sewing and it’s probably become my craft of choice for the moment, although I still have a soft spot for knitting and cross stitch especially in winter time! I started a blog a little while ago called Sewing Belle and most often my posts will be linked back there.

Introducing Emma......

Hi, my name is Emma, I’m blessed to be Mum to 3 little girls. Although that in itself keeps me incredibly busy I still make time in my days to pursue my hobbies. Currently I’m the crazed crocheter out of the four of us. I’m only new to the hook, but thoroughly enjoy whipping little bits up.

I also love upholstering, as this was my job before kids. I do own an industrial sewing machine but it hasn’t seen the light of day for more than a year! It will however become useful in the near future for all the soft furnishings I intend to make for our new house. All my wish list includes now is a compressor, staple gun and a dirty great big workbench!

My last and most neglected hobby would be my portrait drawings, hopefully this blog will encourage me to pull out the ol' pencils and see if I’ve still got the touch!

If there's any hobby that I still hope to try my hands at, it would have to be painting with watercolours. It’s something that has always interested me but I have never quite been brave enough to try. But really, you never know where our hands may take us!

Introducing Sharelle.......

Hi, I’m Sharelle a 23yr old Christian mother of 2 little blessings, Mr W (2.5) & Miss W (6 months) and wife to a wonderful husband. When I’m not running around after two very busy children (in other words when time allows it!), I like to spend my time either behind my sewing machine or my camera!

Sewing has only recently become a passion of mine after hating it through my high school years! There must be something about having children that ignites that creative side in you again! At the moment my sewing skills are pretty basic but I am incredibly lucky to have a super talented Mum (and MIL also!) who are both a wiz behind the sewing machine and are always willing to help me when I need it!

My other ‘love’ is my camera! My darling hubby bought me a SLR camera for my birthday a couple of years ago and I’ve been hooked on it ever since! There really is something beautiful about being able to capture your children’s life in a photo and my kid’s photo albums speak well for that! Hopefully through this blog we'll be able to share some of our creative juices so to speak and inspire others as well!

Welcome!


Hello and welcome to The Handmade Rainbow! We are 4 stay-at-home Mum’s united through Friendship, Faith, Family and a love of all things crafty. Join us here as we share our rainbow of projects together and hopefully inspire along the way!

Now for some introductions!